

Home made bread is such a fantastic and easy to make why not give it a go. Living in Thailand, the Thai bread is OK but many loaves are thinly sliced in the convenience stores and supermarkets. Packs of nice thick bread are small and more expensive so it seems logical to do it yourself.
Home Made Bread Ingredients.
Home made bread can be made a number of ways with different varieties of flour. You can produce white, whole meal and sour dough breads at home. In this recipe for home made bread we will be making a fantastic white loaf.
The list of ingredients isn’t very long and you should have most of them in your pantry. The most important important factor in making great home made bread is the flour. It has to be of the correct type so you have enough gluten. Ensure you choose bread flour normally a OOOO quality because using plain flour will likely not bring the best ingredients.
Ingredients List.
- Bread Flour – 390 Grams
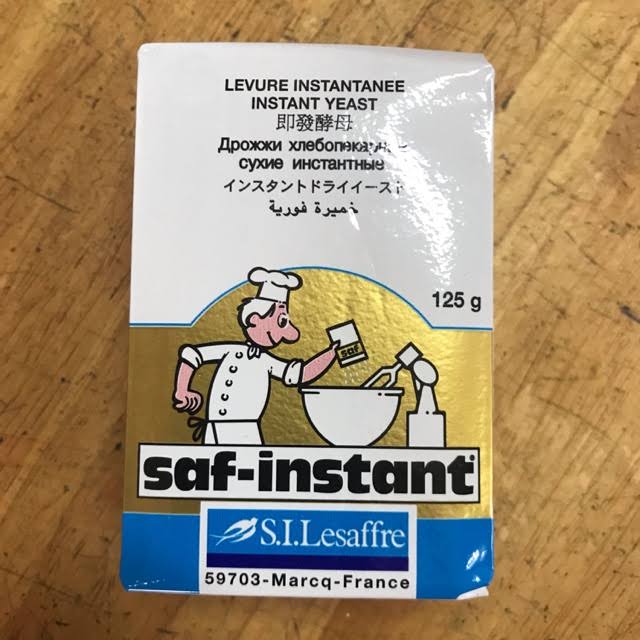
- Yeast – 8 grams/ 1 Teaspoon. (1 Sache)
- Milk – 200 Ml. (50%)
- Sugar – 1 Teaspoon. (Tsp)
- Salt – 1/2 Teaspoon. (Tsp)
- Egg – One.
- Butter – 15 Grams
Your all done with the ingredients so grab them from the pantry and get started.
Home Made Bread Cooking.
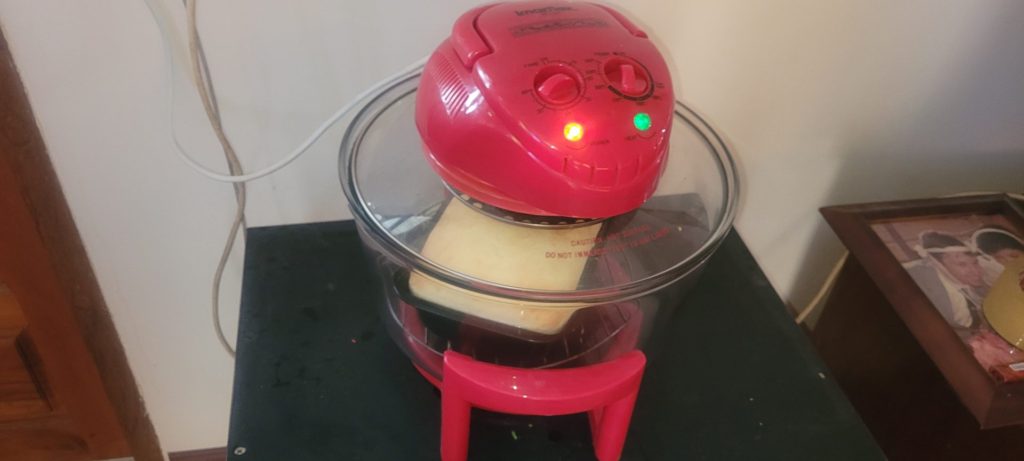
If you don’t have a dedicated oven living as an expat maybe in Thailand then there are portable options. Thai people just don’t use ovens them so you could be limited to what’s available.
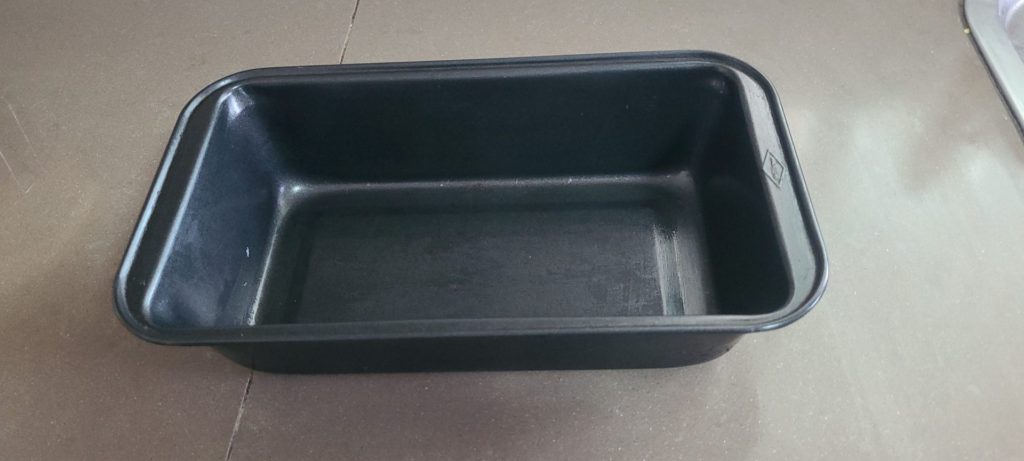
The reason my home made bread cooking is limited to this 8 inch cake/bread tin is I use a portable fan forced oven.
The fan forced ovens like the one below can also used use for baked dinners, and cakes as well. If your reading this and you have a standard American/Australian etc. fan forced oven then you can cook a larger loaf in maybe a 12 inch pan for example.

Started Cooking Home Made Bread.
Let’s get started by getting the yeast ready. There are different types of yeast available so choose a dry yeast in a packet or sachet. It’s cheap and effective but all varieties are as easy to use.
Pour 200 mil of milk into a bowl. The milk needs to be warm around 40 Deg C or 105 Deg F. The temperature helps the yeast to become active, they also need something to feed on so add 1 Teaspoon (Tsp) of sugar to the bowl. Give the bowl a good stir to dissolve the sugar. Now add 1 Tsp of yeast or a prepared sachet which is normally 7 or 8 grams in size.

Give the mixture a good stir then cover it with a tea towel and place it in a warm area out of direct sunlight. The yeast should start to bubble and get frothy. If so the yeast is good and ready to use. If it does not become active you may have old yeast that is no longer alive. If so grab some new yeast and try the process again.

Flour Preparation.
Poor your flour into a bowl (390g) and add your salt (1tsp) then cracked your egg and poor into the mixture. It will be very dry so don’t worry. If your yeast has risen poor the whole container into the flour and start mixing. If you have a mixer with a dough hook feel free to use this. It will save you some time and tired arms.
This mixture ratio of 50% milk to flour mix has worked for me over and over perfectly. Please DO NOT be tempted to add more milk because it’s looking to dry. Yes, It will seem dry but it should mix together to become a smooth moist ball that will bounce back in shape if you poke it with your finger.
Hydration 57% / 50%?
You need to be patient mixing the dough mixture. When I first started I was using a 57% hydration which is recommended with most breads. This was 225 ml of milk and every time I found the mixture sloppy and really hard to kneed. It meant continuing more flour to the mix to make it workable.
After a couple attempts with reducing the mixture from 55% then down to 50%. This has proven to be the best number for this particular dough mixture and possibly my location. I understand local humidity can have some effect on mixtures so your experience could possibly be different.
Kneading.
Kneading your dough does not take to long and makes it finer texture as well as softer. There is no specific way to kneed bread, so don’t stress if you have not done it before.
I start by pushing down and folding the dough over itself then re pushing it down. Repeat in the bowl and once its feeling nice and not sticks you could move it to a work surface. If it’s a smooth surface you likely will not need to put any flour on the surface. If you choose to just add a small amount to the work surface.
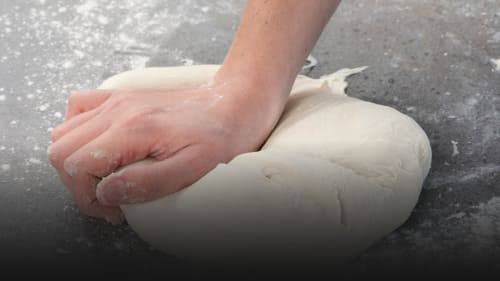
One on the work surface try stretching it out so it’s tearing as it does so. Fold it back over itself then again tear it away from Yourself then again refolding it. Repeat this till the dough is smooth to look at and when I you poke it with your finger the surface bounces back to its original position.

Test The Dough.
The next step is an easy one. Cover your dough in the bowl with a little oil added to stop the dough sticking. Using a towel cover the dough and place it in a warm place not in direct sunlight. If you want to speed this up you can pre warm your oven to 40 Deg then turn it off and place the dough in its bowl in the oven.
I find the first rise takes an hour to hour and a half. In this time have a rest or occupy yourself till the dough had doubled in size.

Knocking the Dough Down.
Take your beautifully aerated dough and push it flat on your bench. Using a rolling pin flatten it out to a rectangle. Roll the dough up into a log. Fold the ends under to round them off with the join also under the bread dough.

Now place the dough into a Pre oiled 8 inch cake tin. Press it down into the corners. The dough needs to rise to double its height or more in the cake tin. It’s OK to cover it with a tea towel in a warm spot or do the oven version if you wish.

It’s takes about an hour for the dough to grow to the correct size. Be patient and let it do its work. Once ready place the dough into a fan forced oven as 170 deg C for 30 minutes. Its normally fully brown top and sides when its ready.
After the bread is cooked and looking delicious in its tin remove the dough in its tin and put it on a rack to cool. This will take 20 minutes or so then you should be able to turn the bread upside down and remove it from the tin.
It may look very white and soft on the bottom. It’s still cooking so leave it upside down and the soft bottom will firm up and change color. Looks amazing when it does. This may take 1/2 an hour till it’s fully cooled.
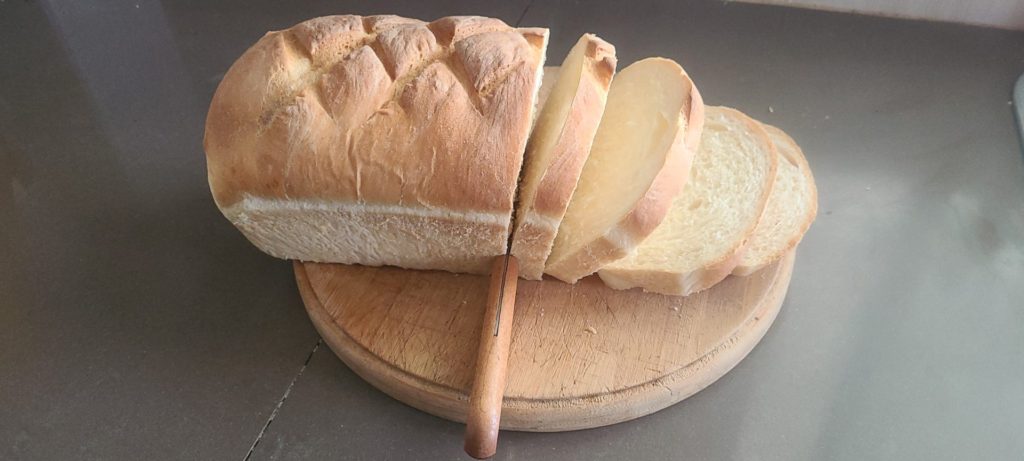
Cutting Your First Slice.
Please be patient and don’t cut the bread before it has become firm on the bottom. Use a good bread knife and gently make a slice of your new bread. It should have a pretty smooth consistency and a firm crust. My bread does not quite have the consistency of supermarket white bread but when it does ill update this post to tell you how to get that as well.


Home Made Bread Conclusion.
The results have been consistent and I have been enjoying my bread for some time now. Making home made bread is a pleasure, it’s relaxing and producing and sharing id great. The satisfaction in producing a quality bread loaf consistently is a real justification for writing this post. I wish you many great loves of bread in the future. Let me know in the comments how you went with this recipe.
Author.
Brendon McAliece is an Expatriate Australian who lives in Thailand. Brendon speaks fluent Thai, has been traveling and living in Thailand for nearly 40 years with his Thai wife of 37 years. Brendon’s travels have taken him to many parts of the world working on military jets as a weapons tech.

More Thailand Posts:
- How to Survive a Hospital Stay in Thailand.
- How to Order Food Like a Native Speaker.
- How to Cook Thai Fried Rice and Make it Spectacular.
- Thailand Village Life – Expats Point of View.
- Expat Life in Thailand – Religion in Daily Life.
- How to get a Spouse Visa – Stay in Thailand.
- Thai Expat Guide to Culture and Daily Life.
- Thai Language Beginners Guide.
- Women in Thailand – What Are they Really Like.
- Thailand Life – Will You Go Crazy in the Village?
- Is Thailand Safe – Guide for Tourists.
- Thailand Land of Smiles!
