
Guitar Chords for BEGINNERS
Guitar Chords for Beginners
Guitar Chords for Beginners starts with Basic Major & Minor Chords
Lets learn some guitar chords for beginners and head you on a path to playing your first song. Lets learn which chords are major and minor to start with. Once we have learnt the basic major & Minor chords in the key of “C” so you can get you started playing a song.
When your just starting the guitar chords for beginners you need to know are basic major and minor chords. We will use the key of C which I am sure you remember is the only key with no sharps (#) or flats (b).
This makes it simpler as a beginner but the whole sharp and flat idea will become a non event in no time. What I mean is it wont concern you just because a key has a flat or a sharp in it. The symbols are what music uses to denote a sharp or a flat.
The Key of C is: 1 – 2 – 3 – 4 – 5 – 6 – 7
C – Dm – Em – F – G – Am – B dim
Blues Progression – Easy One!
Lets start with a popular blues progression which uses the 1-4-5 Chords. Which Chords are these then? Do you Remember?
Of course it the C – F – G Chords. Are these Major or Minor chords? Yes they are major chords.
Lets look at what they look like and how we are going to play them.

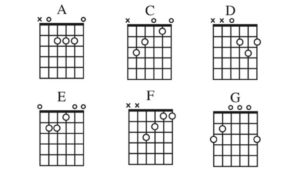
The C Chord
When you start teaching guitar chords for beginners they need to be pretty easy to play. Remember if your new then take your time. Rome wasn’t built in a day and neither was any of your guitar heroes. They all spent years learning to get where they are today.
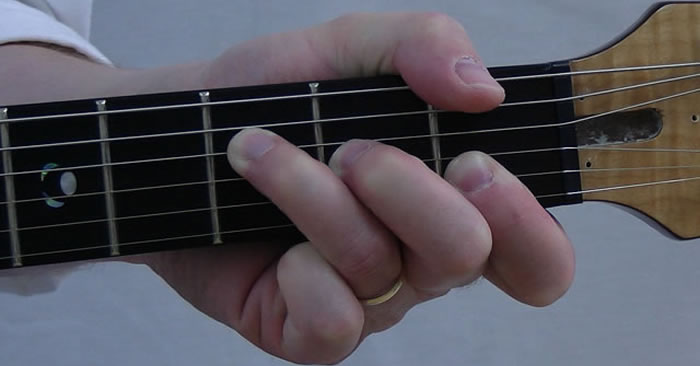
I would recommend starting with the C chord first. Make sure your hand is relaxed and you are playing with the tips of your fingers. If your getting it right then your fingers will likely be sore and you will see the string marks on your fingers.

In the picture right the tips of the fingers are making the C chord perfectly. If your chord sounds muffles or not making any sound you are touching the strings with other fingers and causing the notes not to ring correctly.
Once you get a clear chord play it with just steady down strokes with your right hand. Allow your pick to move over all six strings evenly and don’t try to drag the strings off the guitar. Just gentle strum. It pays to have the pick at a slight angle with the leading edge just sloping down a little. Allow the tip of the pick to pass across the strings evenly and you will have completed your first chord.
Strumming Guitar
Play down strokes in counts of 4. This is strumming guitar in 4/4 time and is a predominant rock strumming pattern. There are many but this is a great starting place.
1 2 3 4 : Repeat
STRUM: Down / Down / Down / Down / : Repeat.

Lets move onto the next chord which is G. The G chord is another very common chord and pretty easy to get your fingers around. I would like to do the same process as above. Get your fingers on the strings making the chord shape and ensure when you are strumming guitar you do it slowly so the strings all sound clear. All six strings can be heard.
Again play this as above till your comfortable. I would like to have you then practice moving from C to G and then back to C slowly. Don’t try and do this to quickly. Crawl first then walk before trying to run ok.
I appreciate your probably impatient to set the world alight but if you go to fast when trying to learn the guitar you will make mistakes and then learn the mistakes.
The G Chord
In the picture to the right the G chord is being played nicely on the open strings. In the picture the person is using their 3rd finger on the high E string at the bottom of the fret board. The more commonly the little finger is used on the little E string. I certainly use my little finger for this chord shape.
Play down strokes in counts of 4. This is 4/4 time and is a predominant rock strumming pattern. There are many but this is a great starting place. When doing these exercises count aloud as this will get you use to counting so you know when to change to the next chord in our upcoming exercise.

Strumming Pattern 1
1 2 3 4 : Repeat
STRUM: Down / Down / Down / Down / : Repeat.
Once you are comfortable with each of these chords we need to get your fingers moving between these two very common chords. You will notice the 3rd and 4th fingers are the same shape in the C and the G Chord as well as the F chord we will look at very soon.
Simply move these up and down as a pair as you change, Move the pair up to make G then down as a pair to make the C chord again. Again move fingers 2 & 3 as a pair up and down then have your first finger on the 2nd string 1st fret and as you move to the G Chord lift the 1st finger as you move 2 & 3 again as a pair then put the little finger down 1st string 3rd fret.
Strumming Pattern 2
C C C C G G G G : Repeat
STRUM: Down / Down / Down / Down / Down / Down / Down / Down /The
Just go slowly as you go and there will be a gap between the chords initially but don’t worry this will get better to the point you can play all these open chord we are learning without even looking. It wont take to long so please persist.
I would home in half to an hour you will be doing this comfortably but if not and your fingers are sore just have a rest and be excited that you have learn’t two new chords…………………….
The F Chord
The F chord is a little harder hence I wanted to leave it to last although the change from C to F is an easy one generally. All three chords employ the same shape with the 3rd and 4th fingers so just move your fingers as a pair up and down vertically as a pair to make these three chords. Your first finger has to lay flat over the two strings at the bottom behind the first fret. Take a quick look at the shapes again and you will see what I mean.
OK, the hard part is the first finger has to lay down over the first two strings on the bottom inside the first fret. The C to F is pretty easy so lets start there once you have the F chord comfortable and can strum it clearly.
IMPORTANT: This is also called a root 5 chord and this means you only strum the 5 higher pitched strings. The very thick string, the E string isn’t played. The two previous chords are root 6 chords and we play all six strings with these. If your looking at a diagram and you see an X on the diagram on the nut this means you don’t play that string.
The D Chord
The D Chord is the staple of many songsand a very easy chord to play. This chord is whats know as a root 5 chord and does not use the low E string. Please avoid this string when playing the D chord or it will sound wrong.
The D Chord is a small triangle shape with your fiorst finger on the first fret 3rd string up and the 2nd finger on the 1st string on the 1st fret with the final third finger on the 2nd string and second fret. There are variations used frequently with Sus 4 chords which you hear in songs like Queens Little THing Called Love. We will discuss these latter.
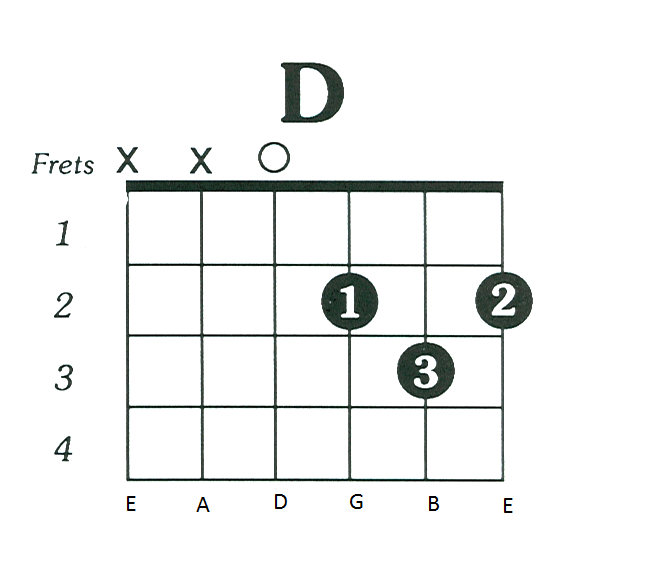
Reading Chord Diagrams
Its important you understand chord diagrams as well. I once had a lady who had been trying to learn guitar herself and couldn’t work out why the chords always sounded wrong. As it turns out she was reading the diagram in reverse. If one person can do it I am sure more can so let me explain it for you.
The Diagram to the right is a D Chord. Disregard the chord but look at the way the diagram is drawn. The Left side represents the thick E string and the right is the thin small E string. The “X”means don’t play this string. Its very important to understand this as the chord will sound wrong. The letters at the bottom are the names of the strings numbers inside the circles are the recommended fingers to be used to make this chord. The vertical lines are the strings and the horizontal lines are the frets.
I hope this makes it all clear for you now. You will no doubt be looking at lots of chord diagrams as you learn all the amazing chord available. The colors and feel of the chords can make a song sad, happy or express many other emotions.
Author

DreamingGuitar.com is Powered by AMAZON.com.
I may earn commission on qualifying purchases.
