 Skip to content
Simple Mixing Tricks for Home Musicians & DIY Audio Engineers
There’s something special about digging out old band recordings and trying to breathe new life into them. Modern tools make it possible to turn rough demos, rehearsal tapes, and even badly mixed recordings into something surprisingly powerful.

Recently while remastering some old tracks from my own band, I experimented with a technique many home musicians wonder about:
“If I have two slightly different versions of the same song, can I pan one left and one right to create a huge wall of sound?”
The short answer is: Yes but there’s a trick to making it work properly.
Why Two Identical Tracks Don’t Always Sound Bigger.
If you simply duplicate a track and pan one hard left and one hard right, you usually won’t get the massive stereo sound you expect.
Instead you often get:
- A louder mono signal
- Weak stereo separation
- Possible phase cancellation
- A hollow or strange sound when summed to mono
That’s because the recordings are too identical.
The magic happens when the tracks have small differences.
The Secret: Slight Variations Create Width
In my case, I had:
- One version with a slightly softer guitar tone and added reverb
- Another version that was drier and more aggressive
Even though they originated from the same recording, those subtle mastering differences created enough variation for the stereo image to open up dramatically.
This is very similar to classic production techniques used by producers like Phil Spector, where multiple layered sounds created the famous “Wall of Sound.”
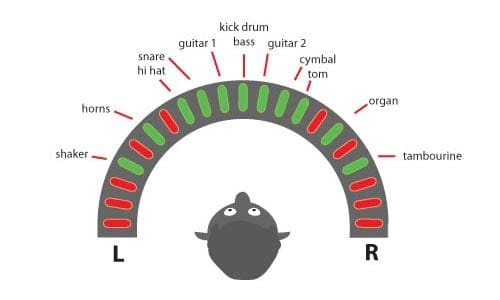
Technique 1 — Stereo Panning.
The first step is simple:
- Pan one version mostly left
- Pan the other mostly right
But don’t always go full 100% left/right immediately.
Try:
- 60–80% left/right for a cohesive mix
- Hard panning only if you want an extreme stereo effect
Why This Works
Because the two tracks are slightly different, your ears interpret them as separate sound sources, which creates width and depth.
Technique 2 — Micro Delays.
One of the easiest ways to make recordings sound huge is using a tiny timing offset.
Try nudging one track by:
- 10–20 milliseconds
This creates a natural “double tracking” effect similar to recording the same guitar or vocal twice.
Important:
Too much delay becomes an audible echo.
Keep it subtle.
Technique 3 — EQ Contrast.
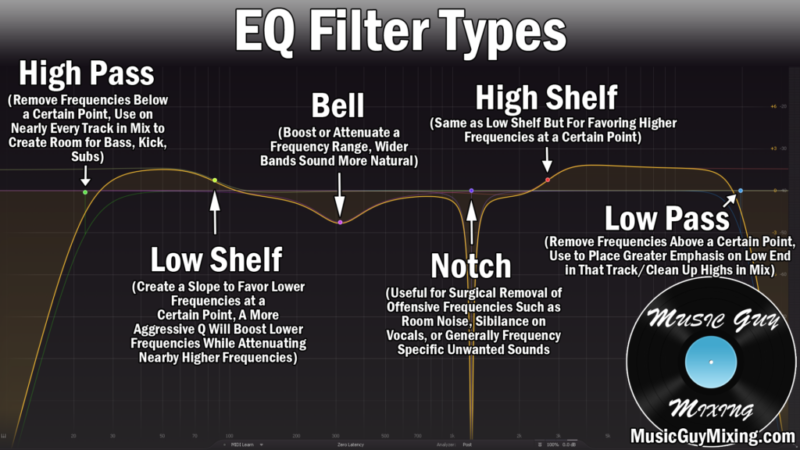
Instead of making both tracks identical in tone, let them complement each other.
For example:
| Track | Suggested Focus |
|---|---|
| Dry version | More mids/presence |
| Reverb version | Softer highs/wider ambience |
This separation helps prevent frequency masking and gives the mix clarity while still sounding massive.
Technique 4 — Bus Compression (“Glue”).
A common mistake is making layered tracks sound like separate recordings fighting each other.
The solution is bus processing.
Route both tracks to a stereo bus and apply:
- Gentle compression
- Tape saturation
- Mild harmonic distortion
This “glues” the layers together into one unified sound.
Technique 5 — Reverb & Ambience.
Reverb is often misunderstood.
Too much makes recordings muddy.
Too little makes them sound small and lifeless.
A good trick is:
- Keep one track relatively dry
- Let the other carry more ambience
Then add a subtle stereo room reverb to the combined bus.
This fills the empty space between speakers and creates depth.
Why Old Recordings Can Actually Benefit From This.
Interestingly, older recordings often work better with these techniques because they already contain imperfections:
- Slight timing inconsistencies
- Analog noise
- Different EQ curves
- Natural dynamics
Those flaws create character.
Modern ultra-clean digital recordings sometimes need artificial processing to recreate the same sense of width and life.
This recording was downloaded off YouTube from a video we made while playing in a small garden pub in a far off land that does not have alcohol (apparently). Anyway I absolutely understand GnR aren’t going to call me to play guitar its far improved over the original. Hey its live and we were having some fun!
The Cheats option is also to upload your audio track to Chat GPT or other AI and specify how you want to improve it of you don’t have all the tools. I don’t! That words well if you have no other option.
Heres the original video! I was a bit younger then 🙂 Click Here for YouTube.
Easy DAW Workflow for Beginners.
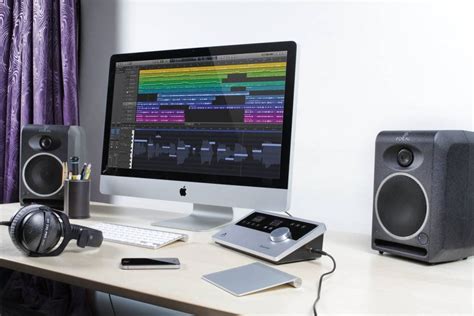
This workflow works well in:
- Audacity
- REAPER
- DaVinci Resolve
- Adobe Audition
Step-by-Step
- Import both versions of the track
- Pan one left and one right
- Offset one by 10–20 ms
- EQ each slightly differently
- Route both to a stereo bus
- Apply gentle compression/saturation
- Add subtle room reverb
- Check the mix in mono to avoid phase problems
Final Thoughts.
The “wall of sound” isn’t really about volume.
It’s about:
- Width
- Depth
- Layering
- Small imperfections
- Spatial contrast
The best mixes often come from combining subtle differences rather than trying to make everything perfectly clean and identical.
Sometimes those old recordings already contain the magic they just need the right treatment to bring it out.
The Author.

Brendon McAliece is a multi lingual expatriate Australian living in Thailand who speaks Thai, a number of its dialects and Lao. He has been playing guitar since he was 12 and continues to do so to this day.
He has performing in bands across the Middle East while contracting as a Aircraft Weapons Instructor with his 10 years of RAAF Armament Fitter experience and his maintained his love for playing guitar it continues to thrive today.
